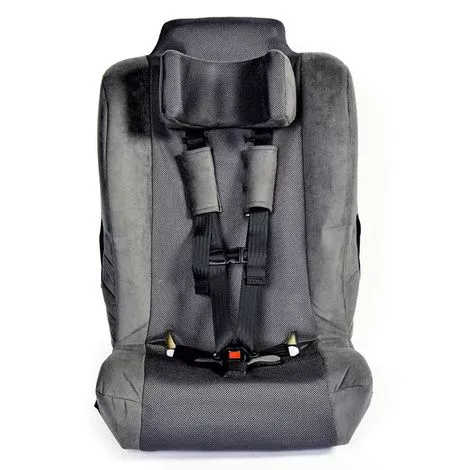
Columbia 2400 Spirit APS Car Seat Features
- Comes in a modern, multi-color design
- Color options that range from bright and vibrant like Convertible Pink to colors created to match the interiors of cars like Speedway Gray
- Offers the highest levels of positioning support
- Wide range of positioning options that include the head, trunk and hip are available to ensure the most optimal positioning is achieved
- Ideal for those with mild to more involved positioning support needs
- Low profile sides for easy transfer of users
Benefits Of Columbia Spirit APS Car Seat
- Standard Model:
- Durable, machine-washable padded cover
- Memory foam back/seat padding reduces sores and fatigue
- Soft-padded headwings
- Latex and silicone free
- Plus Model:
- Swing-Away Padded Trunk Supports
- Swing-Away Padded Hip Supports
- Swing-Away Abductor
- Incontinence Cover:
- Made of water resistant material, utilized to eliminate stain/damage to car seat cover resulting from bladder/bowel discharge
- Buckle Guard:
- Plastic cover to eliminate ability for child or young adult to engage the release button of the five point harness
- Retainer Clip Guard:
- Plastic cover to eliminate ability for child or young adult to disengage the chest clips
- Bolt-In Hardware Kit:
- Required on all vehicles manufactured prior to 2002 to properly secure car seat into vehicle
- 3″ Extensor Thrust Wedge:
- Foam wedge that provides additional aide to a child or young adult that needs assistance in leaning back into the seat
What to buy with Columbia 2400 Adjustable Positioning Car Seat
- Contoured Chest Harness For P Pod Posture Support System
- P Pod Lap Tray
- Convaid Cruiser CX Pediatric Wheelchair – Standard Model
How to use Columbia 2400 Spirit ABS Car Seat?
Installation: Lap-Shoulder Belt (ALR)
- Place the child restraint in a forward-facing position on the vehicle seat.
- Note: If more than 3 inches of the child restraint base extends beyond the front edge of the vehicle seat (not including use of the recline bar), then the vehicle seat is too shallow to properly support the child restraint. If this is the case, DO NOT INSTALL.
- Pull the seat belt out completely to engage the retractor. Do not allow the belt to retract.
- Insert the latch plate (the “male” part of the seat belt buckle) into the outer lower side vehicle belt slot and route the belt around the back of the child restraint
- Pull the seat belt out through the other lower side vehicle belt slot
- Insert the latch plate (the “male” part of the seat belt buckle) into the vehicle’s seat belt buckle
- When routing the vehicle’s seat belt, make sure that the shoulder belt lies within the on top of the seam between the two fabric.
- Place one knee in the child restraint and push down firmly. Starting from the buckle, pull on the shoulder belt portion of the webbing until it is tight.
- Eliminate the slack by releasing the shoulder belt back into the retractor. You should hear a clicking noise as the webbing rewinds.
- Pull on the shoulder belt to ensure that it is locked. If properly engaged, you should not be able to create any slack in the seat belt. Ensure that the child restraint is held down firmly into the vehicle seat.
- The tightness of the installation should ensure that there is no more than 1-inch of movement of the child restraint. If there is more than 1-inch of movement, then the installation is incorrect and must be redone.
Installation: Lap-Shoulder Belt (ELR)
- Lift the cover from the child restraint to reveal the tether slots. Insert each of the metal bracket ends of the tether strap into the right and left tether slots (insert from front to back). You will have to turn the bracket horizontally (as shown on right) then insert the bracket completely into the slot. The tether strap will wrap over the top of the child restraint frame and down the back. Reposition cover.
- Place the child restraint in a forward-facing position on the vehicle seat.
- Note: If more than 3 inches of the child restraint base extends beyond the front edge of the vehicle seat (not including use of the recline bar), then the vehicle seat is too shallow to properly support the child restraint. If this is the case, DO NOT INSTALL.
- Pull the seat belt out completely. Then,
- Insert the latch plate (the “male” part of the seat belt buckle) into the outer lower side vehicle belt slot and route the belt around the back of the child restraint
- Pull the seat belt out through the other lower side vehicle belt slot
- Insert the latch plate (the “male” part of the seat belt buckle) into the vehicle’s seat belt buckle.
- Place one knee in the child restraint and push down firmly while pulling on the shoulder belt to tighten and remove any slack from the lap portion of the belt.
- With one hand, firmly hold the shoulder and lap portions of the seat belt together, immediately behind the latch. Then, release the seat belt latch from the buckle.
- Fold the webbing and thread it through the locking clip, as shown above, keeping the locking clip as close as possible to the latch plate (no further than 0.5-inch). Buckle the seat belt checking that the child restraint is tightly in place.
- The tightness of the installation should ensure that there is no more than 1-inch of movement of the child restraint. If there is more than 1-inch of movement, then the installation is incorrect and must be redone.
Installation: Lap Belt (ALR)
- Lift the cover from the child restraint to reveal the tether slots. Insert each of the metal bracket ends of the tether strap into the right and left tether slots (insert from front to back). You will have to turn the bracket horizontally (as shown on right) then insert the bracket completely into the slot. The tether strap will wrap over the top of the child restraint frame and down the back. Reposition cover.
- Place the child restraint in a forward-facing position on the vehicle seat.
- Note: If more than 3 inches of the child restraint base extends beyond the front edge of the vehicle seat (not including use of the recline bar), then the vehicle seat is too shallow to properly support the child restraint. If this is the case, DO NOT INSTALL.
- Pull the lap belt out completely. Then,
- Insert the latch plate (the “male” part of the seat belt buckle) into the outer lower side vehicle belt slot and route the belt around the back of the child restraint
- Pull the seat belt out through the other lower side vehicle belt slot
- Insert the latch plate (the “male” part of the seat belt buckle) into the vehicle’s seat belt buckle
- Place one knee in the child restraint and push down firmly while pulling on the lap belt to tighten and removing all slack. Make sure that the child restraint is flat against the vehicle seat back and bottom.
- The tightness of the installation should ensure that there is no more than 1-inch of movement of the child restraint. If there is more than 1-inch of movement, then the installation is incorrect and must be redone.
Installing the Tether
- Lift the cover from the child restraint to reveal the tether slots. Insert each of the metal bracket ends of the tether strap into the right and left tether slots (insert from front to back). Turn the bracket horizontally (as shown on right) then insert the bracket completely into the slot. The tether strap will wrap over the top of the child restraint frame and down the back. Reposition cover.
- After the child restraint has been installed using the vehicle’s seat belts, attach the tether hook(s) to the vehicle’s tether anchor(s). The primary tether anchor to use will be located immediately behind the child restraint
- For individuals LESS than 80 lb (36 kg): attach one tether hook to the tether anchor immediately behind the child restraint.
- For individuals GREATER than 80 lb (36 kg): use two tether hooks, attaching one tether hook to the tether anchor immediately behind the child restraint AND the other tether hook to the closest adjacent tether anchor.
- After the hooks are secured, firmly adjust the tension on tether strap with adjuster sliders making sure there is no slack on the strap.
For more information please check out Columbia 2400 Spirit APS Car Seat User Manual