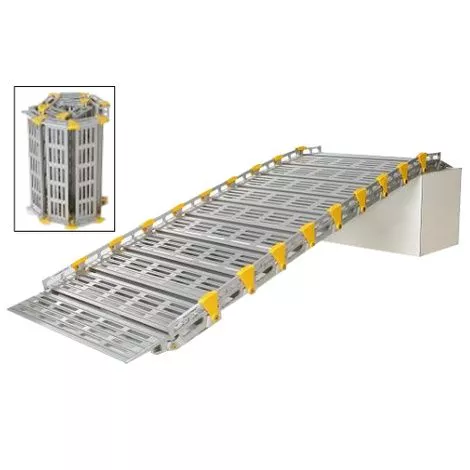
Roll-A-Ramp 26 inch Wide Ramp Features
- Allows access to vehicle and can transfer to an entry ramp for your house in minutes
- Portable Ramp includes angled approach plates on each end for smooth entry and exit
- Safe to use with built-in side rails
- Carrying strap included
- Can be built to comply with ADA standards
- Roll-A-Ramp is compatible with:
- Manual wheelchairs
- Power chairs
- Scooters
- 3-wheel scooters
- Walkers and bariatric chairs
Where to use Roll-A-Ramp?
- Homes / Apartments
- Vans
- Trucks
- Boats
- Airplanes
- Churches
- Schools
- Restaurants
- Hotels
- Appointments
- Temporary ramp
- Note: Additional links are not included with ramp
What to buy with Roll-A-Ramp 26″
- Roll-A-Ramp Additional Portable Ramp Links (Code 31262)
- Roll-A-Ramp Support Stand
How to use Roll-A-Ramp ?
- To use Roll-A-Ramp, lay the rolled-up ramp on its side, remove the strap, and then unroll the ramp to its full length before putting it in place
- To roll up the ramp, reverse the process, snap on the strap, and go
- Yellow pinch point covers are secured to the head of each bolt and are designed to keep the fingers out of the pinch zone and must be on at all times
- Do not use your ramp without all Pinch Point Covers in place
- Never tamper with or remove these covers for any reason as injury may occur
Ramp Placement of Roll-A-Ramp 26″
- To ensure safety and to prevent damage to ramp, one must place the first load-bearing link of the elevated end of the ramp on the landing
- The approach plate is not a load-bearing link
- Notice that one end of each ramp is marked Upper End
- This end must always be the elevated end of the ramp
- The links on the upper end of your Roll-A-Ramp have a 1° Camber and the links on the lower end have a 0°Camber
- This 0° loft at the lower end of the ramp allows the wheelchair, machine or another device to get on the ramp on a non-arched plane
- As the wheelchair goes up the Roll-A-Ramp, the arching links allow the user to more easily enter a van, porch, or doorway because of the more favorable approach angle
- This also ensures clearance for lower devices
- Again, by placing the ramp with the Upper End at the elevated position, operation will be more favorable
Changing Ramp Length of Wheelchair Portable Ramp
- Roll-A-Ramp is designed so one may change the length by simply adding additional 1-foot links or removing links
- This is done by removing the bolt and nut from the link on the lower end and inserting additional 1-foot links as needed
Versatility of Roll-A-Ramp Ramp
- Lightweight Roll-A-Ramp rolls up and comes with its own handy strap/handle for convenient carrying and storage. One can configure the Roll-A-Ramp for many different uses. Besides using it as a completely portable ramp system, one can modify the Roll-A-Ramp so that the ramp is rigid or folds in the center for easy mounting into a vehicle. To make the ramp fold in the middle one will want to have two pivot points per single ramp.
- Versatility To convert the Roll-A-Ramp so that it folds in the middle:
- Lay the Roll-A-Ramp bottom side up
- Add washers under nuts where the ramp will be rigid
- Fully tighten all bolts using the 1/2 (13mm) Wrench and Allen Wrench
- Do not tighten the bolts at the pivot point
- One may find that a socket wrench (1/2) works better Ramp
How to Assemble Roll-A-Ramp Wheelchair Ramp?
- Remove both sections of the ramp from their individual boxes taking special note of TOP section and BOTTOM section as noted on the boxes.
- Identify the Owner Manual and tools to assemble the ramp. Also, identify any accessories ordered with the ramp. The accessories will be included in a separate cardboard box inside one of the sections of the ramp or in the zip-lock bag with the Owner Manual.
- Remove zip-ties from the ramp sections and then place the ramp on edge and roll out. Place on a flat surface with the top surface of the ramp down.
- Place two sections close together. One section of the ramp will have a bolt, caution cover and nut attached through the bolt holes. Remove this hardware and move the two sections together so that the tabs are overlapping on both sides and the sides of the ramp are even.
- Insert bolts with yellow caution cover through both holes. This may take some maneuvering to line up the holes. Put on the nut.
- Locate box wrench and Allen wrench from the Owner Manual packet. Use these tools to tighten the connection on the ramp. Do not over-tighten. Position the caution cover over the pinch point on the side of the ramp.
Roll-A-Ramp Instruction Guides
- Roll-A-Ramp Length Determination
- Roll-A-Ramp Length Calculator Chart
- Roll-A-Ramp Quick Reference Guide
- Roll-A-Ramp Instruction Manual