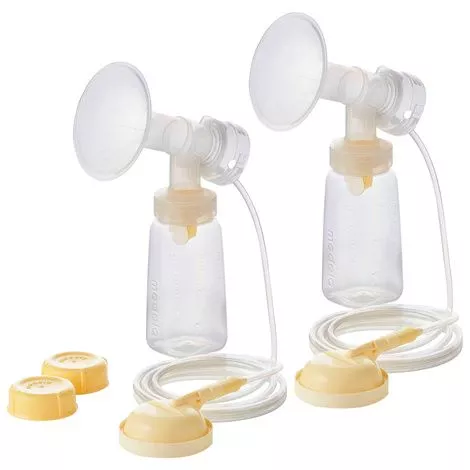
Features of Medela Symphony Breast Pump Kit
- For Use with all Symphony Breast Pumps, for Single or Double Pumping: Medela researchers found that double pumping obtains 18% more milk on average, compared to single pumping.
- More Milk, More Comfort: PersonalFit Flex breast shield for increased comfort and 11.8% more milk.
- Safely Collect, Store and Feed Breast Milk: User can pump breast milk and store in the same container
- Safe for Families: All parts that touch breast milk are made without natural rubber latex, BPA or DEHP
What to buy with Medela Symphony Double Pumping System
- Medela PersonalFit Breast Shield
- Medela Breast Pump Carry Bag
- Medela Extra Membranes For Breast Pump
How to assemble Medela Personal Breastpump Kit?
- Wash hands thoroughly with soap and water before touching breast pump, kit and breasts. Avoid touching the inside of containers or lids.
- Carefully push the white membrane onto the yellow valve head until it engages and is laying flat.
- Push the breast shield onto the connector
- Push yellow valve head onto inner ring of connector bottom.
- Screw connector onto the bottle/container.
- Insert the tubing into the corresponding opening in the connector.
- Place the protective membrane onto a fl at surface and carefully push the membrane cap down until it engages.
- Insert the tubing adapter into the opening in the membrane cap.
- Open the lid of the breast pump. Press the oval button on the top of the Symphony and lift the handle.
- Position the membrane cap fi rmly on the breast pump membrane to form a seal. Center the tubing connector in the recess in the pump housing. Make sure that the membrane cap engages and lies fl ush to the surface.
- Center the tubing connector in the recess in the pump housing. Make sure that the membrane cap engages and lies fl ush to the surface.
- Close the lid.
Note: For step 12: Always close the lid when pumping. The lid keeps the membrane cap pushed down to prevent a loss of vacuum that could occur if the membrane cap came off. - Center breast shields over your nipples and start pumping. (Caution: pushing shields too fi rmly onto breasts may affect milk flow.)
- To turn the pump on, press the power button. You will be starting in the Stimulation Phase. After 2 minutes, the pump will automatically change to the Expression Phase.
- If let-down occurs before the Expression Phase begins, press the let-down button to begin the Expression Phase.
- When your pumping session is over, store your breast milk and clean your kit. Refer to sections 3-6 for cleaning instructions. Refer to section 10 for breast milk storage guidelines.
How to care for Medela Symphony Breast Pumps?
- Separate parts for washing.
- Wash breast pump kit parts after each use.
- Take care not to damage parts of the pump kit during cleaning.
- It is not necessary to wash tubing, membrane cap or protective membrane prior to fi rst use.
- Only wash tubing if milk is present or tubing is soiled.
- Rinse all separated parts that came in contact with breast and breast milk in cool water in order to remove breast milk residue.
- Wash in sink with dedicated basin:
- Once rinsed, parts that have touched the breast or breast milk should be placed in a clean wash basin, dedicated to only cleaning these items. Do not place parts directly in the sink.
- Soak all separated parts in warm, soapy water for 5 minutes.
- Wash each part with a clean dishcloth or soft brush.
- Rinse all separated parts with clear water.
- Place parts on a clean surface and/or towel. Allow all parts to air dry. Store dry parts in a clean, cool place when not in use. Do not store wet or damp parts.